TL;DR:
We faced timeouts using AWS Lambda and FFmpeg for video editing tasks, so I designed a scalable, event-driven system using Kubernetes and Kafka. The architecture separates API and job processing for independent scaling and uses KEDA for autoscaling. The tech stack includes Golang, Viper, and Docker. Key considerations include secure execution and file handling. Future work will cover Dockerization, CI/CD pipelines, and Kubernetes deployment. Full implementation is on GitHub for review and contributions.
GitHub Repository: https://github.com/douglasdgoulart/video-editor-api
Introduction
A few days ago, I was chatting with a coworker about building a scalable system for video editing. At the time, we had just two use cases: generating video thumbnails and combining videos (either side-by-side or picture-in-picture). We were using an AWS Lambda Stack triggered by API calls and an FFmpeg layer for video processing. However, our requests frequently timed out because of the heavy processing load.
The timeout issues got me thinking about designing a scalable on-demand system to handle this heavy load more efficiently. I aimed to create an architecture that could manage these intensive tasks without timing out and still deliver quick results. I decided to explore an event-driven architecture to see if it could solve our problems.
This article documents the idea and the decisions I made during development. It’s not a step-by-step tutorial but rather a reflection on the process. If you want to check out the current state of the project or contribute, you can find it on my GitHub.
What is FFmpeg?
According to their website:
About FFmpeg
FFmpeg is the leading multimedia framework, able to decode, encode, transcode, mux, demux, stream, filter and play pretty much anything that humans and machines have created. It supports the most obscure ancient formats up to the cutting edge. No matter if they were designed by some standards committee, the community or a corporation. It is also highly portable: FFmpeg compiles, runs, and passes our testing infrastructure FATE across Linux, Mac OS X, Microsoft Windows, the BSDs, Solaris, etc. under a wide variety of build environments, machine architectures, and configurations.
The Architecture Draft
The system I had in mind would run in a Kubernetes environment. I planned to use KEDA for autoscaling my application (I will go deeper into deployment in part 2, soon).
The idea was to split the API and the job that would actually run the FFmpeg task. The communication between them would use a message broker. I chose Kafka initially. When the user triggers the API, it calls a job that handles the heavy FFmpeg load. Once the task is done, the user receives the result via a webhook call, notifying them when to retrieve the result file.
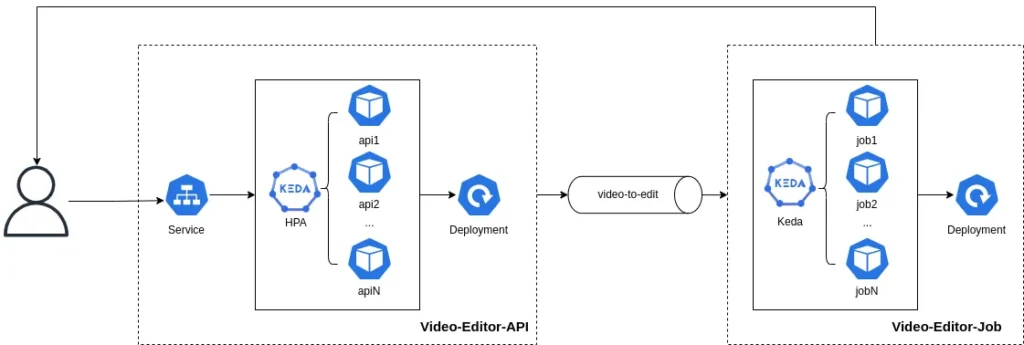
We have separate deployments, allowing us to scale both the API and jobs independently. My plan is to scale the job to zero when there is no demand and upscale when the topic lag increases.
The diagram sequence would look something like this:

Structuring the Code
The project structure follows the Golang pattern, similar to projects like Kubernetes or GitHub CLI. The structure is as follows:
video-editor-api/
├── internal/
├── cmd/
├── pkg/
├── scripts/
├── .mockery.yaml
├── Makefile
├── config.yaml
├── go.mod
- internal: This directory is for packages not meant to be imported by code outside of the
video-editor-apimodule. This keeps internal components encapsulated and hidden from other modules. - cmd: Contains the main application entry point. It holds the executable code, typically organized as subdirectories for different commands (e.g.,
app). - pkg: This directory is used for libraries meant to be imported and used by external applications. It includes various packages that implement the core functionality of the application.
- go.mod: This file defines the module’s path and its dependencies. It is used by Go modules to manage and version dependencies for the project.
- .mockery.yaml: This configuration file is used by Mockery, a mocking framework for Go. It specifies settings for generating mock interfaces in the project.
- Makefile: A build automation tool that defines a set of tasks to be executed. In this project, it’s used to compile the code, run tests, download dependencies, and handle other routine tasks.
- config.yaml: A configuration file written in YAML format. It contains settings and parameters for the application, such as API settings, job configurations, Kafka settings, and logging levels.
Configuring the Project
I always start my Go projects with a configuration setup that helps me test my code further. To accomplish this, I use the Viper library, which handles configuration with ease and allows both configuration files and environment variable overrides.
pkg/configuration/config.go:
package configuration

import (
	"log/slog"
	"os"
	"strings"

	"github.com/spf13/viper"
)

type Configuration struct {
	LogLevel string `mapstructure:"log_level"`
	Logger   *slog.Logger
}

func NewLogger(logLevel string) *slog.Logger {
	var parsedlogLevel slog.Level
	switch strings.ToUpper(logLevel) {
	case "DEBUG":
		parsedlogLevel = slog.LevelDebug
	case "INFO":
		parsedlogLevel = slog.LevelInfo
	case "WARN":
		parsedlogLevel = slog.LevelWarn
	case "ERROR":
		parsedlogLevel = slog.LevelError
	default:
		parsedlogLevel = slog.LevelInfo
	}
	opts := &slog.HandlerOptions{
		Level: parsedlogLevel,
	}

	handler := slog.NewTextHandler(os.Stdout, opts)
	logger := slog.New(handler)
	slog.SetDefault(logger)

	return logger
}

func NewConfiguration() *Configuration {
	viper.SetConfigName("config")
	viper.SetConfigType("yaml")
	viper.AddConfigPath(".")

	viper.SetEnvKeyReplacer(strings.NewReplacer(".", "_"))
	viper.AutomaticEnv()

	logLevel := viper.GetString("log_level")
	logger := NewLogger(logLevel)

	if err := viper.ReadInConfig(); err != nil {
		if _, ok := err.(viper.ConfigFileNotFoundError); ok {
			slog.Error("Config file not found", "error", err)
			panic(err)
		} else {
			slog.Error("Error reading config file", "error", err)
			panic(err)
		}
	}

	var config Configuration
	err := viper.Unmarshal(&config)
	if err != nil {
		slog.Error("Unable to decode into struct", "error", err)
		panic(err)
	}

	config.Logger = logger

	slog.Debug("Configuration loaded", "config", config)

	return &config
}
config.yaml
log_level: debug
The way we’ve configured Viper allows us to override YAML configuration with environment variables, like export LOG_LEVEL=warn at the application startup.
This is just a basic logger configuration, but it will be used throughout the project.
Turning FFmpeg into JSON
I had some contact with FFmpeg in my career, but I’m sure I haven’t scratched the surface. FFmpeg is a complex tool, and trying to handle all its use cases would be a rabbit hole.
So, I asked ChatGPT to give me a JSON structure that could handle FFmpeg usage. The result was pretty good for now, but I’m sure there is a lot to improve. Here’s the result:
package request

type Input struct {
	FileURL          string `json:"file_url,omitempty"`
	UploadedFilePath string `json:"uploaded_file_path,omitempty"`
}

type Output struct {
	FilePattern string `json:"file_pattern,omitempty" required:"true"`
	WebhookURL  string `json:"webhook_url,omitempty"`
}

type EditorRequest struct {
	Input        Input             `json:"input,omitempty"`
	Output       Output            `json:"output" required:"true"`
	Codec        string            `json:"codec,omitempty"`
	Bitrate      string            `json:"bitrate,omitempty"`
	Resolution   string            `json:"resolution,omitempty"`
	AudioCodec   string            `json:"audio_codec,omitempty"`
	AudioBitrate string            `json:"audio_bitrate,omitempty"`
	Filters      map[string]string `json:"filters,omitempty"`
	ExtraOptions string            `json:"extra_options,omitempty"`
	StartTime    string            `json:"start_time,omitempty"`
	Frames       string            `json:"frames,omitempty"`
}
So, we have three main structures:
- Input: Contains information about the input file. The job will handle a single file at a time. The file can be uploaded using multipart or passed as a URL.
- Output: This includes an output name pattern, which can be a simple name like
video.mp4in most cases, but it can also assume a pattern likevideo%04d.mp4if you’re handling multiple files. This structure also includes the webhook that will be called at the end of the process. - EditorRequest: This is where the magic happens. It handles all (or at least tries to) FFmpeg filters, muxers, protocols, and operations.
Note: You might have noticed the required:"true" tag in the code. This is a validation I made using the Golang reflect library. It can be found in the pkg/validator/validator.go file. There is probably a library to do this, but I like to use these projects to apply concepts I haven’t used in a while.
The Editor
First, I built a Makefile script to download FFmpeg locally. We use the static build from John Van Sickle to have the FFmpeg dependency locally.
# Download and extract FFmpeg
$(FFMPEG_DIR):
	@echo "Downloading FFmpeg..."
	@mkdir -p $(FFMPEG_DIR)
	@curl -L $(FFMPEG_URL) -o ffmpeg-$(FFMPEG_VERSION)-$(FFMPEG_BUILD)-static.tar.xz
	@curl -L $(FFMPEG_URL).md5 -o ffmpeg-$(FFMPEG_VERSION)-$(FFMPEG_BUILD)-static.tar.xz.md5
	@echo "Verifying MD5 checksum..."
	@md5sum --quiet -c ffmpeg-$(FFMPEG_VERSION)-$(FFMPEG_BUILD)-static.tar.xz.md5
	@tar -xf ffmpeg-$(FFMPEG_VERSION)-$(FFMPEG_BUILD)-static.tar.xz -C $(FFMPEG_DIR) --strip-components=1
	@rm ffmpeg-$(FFMPEG_VERSION)-$(FFMPEG_BUILD)-static.tar.xz ffmpeg-$(FFMPEG_VERSION)-$(FFMPEG_BUILD)-static.tar.xz.md5

# Ensure FFmpeg is available
ffmpeg: $(FFMPEG_DIR)
By running make ffmpeg, you will have FFmpeg downloaded into your local bin directory.
Now, with the FFmpeg binary in hand, we can integrate everything into the editor. To accomplish this, we will use the exec.Command from the Golang standard library. This library allows us to execute the FFmpeg CLI, passing our arguments from the JSON payload. We will combine the flags and run it in a given context. The context is important so that the user can define an execution timeout, avoiding processing tasks like the entire “Lord of the Rings” trilogy at once.
package editor

// The imports ...

func (f *FfmpegEditor) HandleRequest(ctx context.Context, req request.EditorRequest) (output []string, err error) {
	outputPattern := f.getOutputPath(req.Output.FilePattern)
	outputPath := filepath.Dir(outputPattern)
	req.Output.FilePattern = outputPattern

cmd, err := f.buildCommand(req)
if err != nil {
	return
}

cmd.Stdout = os.Stdout
cmd.Stderr = os.Stderr

result := make(chan error)

go func(resultChannel chan<- error) {
	f.logger.Info("Running command", "command", strings.Join(cmd.Args, " "))
	err := cmd.Run()
	f.logger.Info("Command finished", "error", err)
	resultChannel <- err
}(result)

f.logger.Info("Waiting for command to finish")
select {
case <-ctx.Done():
	err = cmd.Process.Kill()
	if err != nil {
		f.logger.Error("Failed to kill process", "error", err)
	}
	err = fmt.Errorf("process killed")
	return
case err = <-result:
	if err != nil {
		return
	}
}
f.logger.Info("Command finished successfully")

output, err = getFilesInDirectory(outputPath)
return
}

// Some other functions

func (f *FfmpegEditor) buildCommand(req request.EditorRequest) (*exec.Cmd, error) {
	var inputFilePath string

if req.Input.FileURL != "" {
	inputFilePath = req.Input.FileURL
} else if req.Input.UploadedFilePath != "" {
	inputFilePath = req.Input.UploadedFilePath
} else {
	return nil, fmt.Errorf("no valid input file provided")
}

args := []string{"-y"}

if req.StartTime != "" {
	args = append(args, "-ss", req.StartTime)
}

args = append(args, "-i", inputFilePath)

if len(req.Filters) > 0 {
	var filterStrings []string

	for name, options := range req.Filters {
		if options == "" {
			filterStrings = append(filterStrings, name)
			continue
		}

		filterString := fmt.Sprintf("%s=%s", name, options)
		filterStrings = append(filterStrings, filterString)
	}

	filterGraph := strings.Join(filterStrings, ",")
	args = append(args, "-vf", filterGraph)
}
if req.Frames != "" {
	args = append(args, "-frames:v", req.Frames)
}

if req.ExtraOptions != "" {
	extraArgs := strings.Split(req.ExtraOptions, " ")
	args = append(args, extraArgs...)
}

args = append(args, req.Output.FilePattern)

cmd := exec.Command(f.BinaryPath, args...)

f.logger.Info("Running command", "command", strings.Join(cmd.Args, " "))
return cmd, nil
}
Security (???)
While writing the editor, I wondered: How can I make this safe? We are connecting user requests to our server’s bash. How can this be secure?
After some research on the safety of exec.Command, it seems pretty safe as long as we hardcode our binary path. Checking the Golang source code, it appears that the runtime just triggers a fork syscall into the operating system, passing the binary as an argument and all the rest as flags. This makes it difficult to run anything other than our FFmpeg binary.
I tried running some tests with arguments like https://example.com/video.mp4; && touch /tmp/infected. None of these arguments worked. They just broke the FFmpeg execution, but nothing happened in the execution environment. If you disagree, please let me know in the comments and show me how it is unsafe. I didn’t find any issues, but that doesn’t mean there isn’t a way to exploit this.
There is still another security issue related to file upload, but we can leave that for a future article.
Sending to the Queue
This part was pretty straightforward. I have another blog post focusing more on Kafka. If you’re interested, you can check it here.
The idea of having a queue in an event-driven system is to decouple the two ends. This way, on the consumer end, it doesn’t matter who is producing, whether it is up or down, or how many messages per second it produces. The consumer just has to consume them. The same applies to the producer end. The idea is to have another software handle the complexity of distributing the producers’ messages to the consumers, which is where Kafka stands in our solution.
But Kafka isn’t the only solution for this, right? You can build a queue using Golang’s standard library with channels if you want. That’s why I decided to create both an emitter interface and a receiver interface.
type EventEmitter interface {
	Send(ctx context.Context, event event.Event) error
}
pkg/event/receiver/receiver.go
type EventReceiver interface {
	Receive(ctx context.Context, handler func(event *event.Event) error)
}
After defining the interfaces, it was time to implement them. I implemented both ways, using Kafka and an internal queue, allowing the project to be built into a single self-contained binary if the user wants. You can check the producers’ and consumers’ implementations in the source code. It’s pretty straightforward using the franz-go library.
The API
The final piece of the project is the API, which allows users to make requests and retrieve their processed video files. I used the Echo framework for its simplicity and my familiarity with it, enabling me to get things running quickly and efficiently.
Endpoints
The API exposes three main endpoints:
- Health (
/health): Provides a quick way to check if the service is running. - Process (
/process): Handles video processing requests by accepting multipart form data, including the video file and a JSON payload describing the processing. - Static Files (
/files): Serves the processed video files from the specified output directory.
All the magic actually happens at the /process endpoint, where users can request the video processing they need.
func (ph *ProcessHandler) Handler(c echo.Context) error {
	request, err := ph.parseRequest(c)
	if err != nil {
		return ph.respondWithError(c, http.StatusBadRequest, "invalid request", err)
	}

	fileLocation, err := ph.handleFileUpload(c)
	if err != nil {
		return ph.respondWithError(c, http.StatusInternalServerError, "internal server error", err)
	}
	request.Input.UploadedFilePath = fileLocation

	eventId, err := ph.processEvent(c, request)
	if err != nil {
		return ph.respondWithError(c, http.StatusInternalServerError, "internal server error", err)
	}

	return c.JSON(http.StatusOK, map[string]string{"message": "processing request", "id": eventId})
}
This route validates the user’s request, saves the uploaded file locally, and triggers the message to be processed. If everything is okay, the user will receive the ID of the request just created. Once the request is completed, the user will be notified via the webhook.
Is That It?
While this article covers a substantial portion of the project’s foundation, many aspects were not discussed, such as mocking, testing, and the specific services that integrate these components. Proper mocking and testing ensure reliability and maintainability, while services like logging and monitoring enhance robustness. Handling user-uploaded files securely and optimizing performance are also crucial areas that need attention.
Additionally, security aspects related to file uploads were only briefly mentioned. Implementing robust validation and sanitization mechanisms is essential to safeguard the system. For those interested in exploring the project further, the complete source code is available on my GitHub. Feel free to review, suggest improvements, or contribute to the project.
In future posts, I plan to address these omitted topics in greater detail. We will explore advanced testing strategies, integration of essential services, and security best practices. Stay tuned for these updates, and feel free to leave any questions or comments.
Next Steps
Looking ahead, we plan to containerize the application using Docker, which provides a consistent environment for running applications and simplifies deployment. Setting up a CI/CD pipeline is also a priority, automating the process of building, testing, and deploying the application, thus improving efficiency and reliability.
Deploying the application to a Kubernetes cluster using KEDA for autoscaling is another significant step. Kubernetes offers features like automatic scaling and self-healing, and KEDA enables efficient handling of varying workloads. These steps will ensure optimal performance and resource utilization.
Additionally, numerous features and enhancements are planned for the source code. Extending video processing capabilities, improving error handling, and enhancing the user interface are among the priorities. Future blog posts will provide detailed guides on these steps, starting with Dockerizing the application and setting up the CI/CD pipeline, followed by Kubernetes deployment.
Be First to Comment